Wednesday, June 27, 2012

Coming This Summer

In 24 hours from now I will be going from 1 kiddo all day to 4.  Which is lovely and exciting...and daunting all at the same time.

Our Days Left of School Countdown

The other day I read a beautiful quote.

The 
days are long,
and the 
years are short.

So true.
And while I am not a big saver of every drawing and craft, I do love to keep and display my favourite memories of and creations from my children.

Summer is a fun time to hang out with the kids, but if you crave a little project or two of your own then you are not alone.  Over the holidays I will be posting a variety of ways to store/display special items you may have been collecting over the years.  


Also...

I will be periodically sharing my favourite stores with you.


All the kids together.
Projects.
Shopping.
Could summer BE any better??

Sunday, June 24, 2012

Room Number Four (Finally)

So it took a few months, but I finally got Jake's room done.
Welcome!


Let's have a look at where we started.
Any flat surfaces were piled with stuff...from the desk and dresser to all the window sills. 


The curtains were dragging the space down and items were piling up on the floor so that I was having a hard time getting in there to clean.


My goals:
-purge things that were no longer used
-hem curtains
-create a display area for all the knick knacks that Jake wanted to keep
-hang pictures in a more cohesive way
-add some special features that would be fun for a nearly 12 year old boy


Despite my dislike of sewing, the curtains were the easy part.
Next we removed every item that had been on display around the room and put everything Jake wanted to keep in a box.


I switched out his old dresser for a bigger one that we had been using for storage.


I purchased 3 shelves from Jysk and created an area where he could keep all his special items that he wanted on display.  Yes, there is a lot of stuff up there, but it is all contained and now I can at least dust the window sills and he can use his desk!


Together we purged books he no longer read and tidied his shelves.  The space on the right is his special hunting and fishing area.  I did not touch anything there because he is very particular about how it is kept and I wanted to respect his space and his taste in how he set it up.


We moved his desk and I gave him a love seat which he was VERY excited about.


I created a collage on his wall with all his pictures.  
Yep, I hung up squirrel hides with my bare hands.


I created a spot where Jake could display his archery badges.  
One of my favourite moments was when he insisted on keeping a laminated calendar page which I hung in his nursery before he was born.  I have always loved this saying... and I guess he does too!


Overall the room feels really cozy and much more peaceful.  


A Mama's proud moment?
When the preteen is so excited about his new room that he invites his siblings in for a movie on his new love seat...lava lamp and all.


Wednesday, June 20, 2012

A Little Vent

Hey, let's play that game where you find the differences between two pictures.
See if you can find 3 things missing from the bottom shot.


Yah.  That's right.  While we were away on holiday, somebody STOLE my two black plant stands AND my artificial plant!  STOLE THEM.  Words just do not express my annoyance at this.  I have a certain amount of patience when a teenager steals, say, a car.  We were all young.  We all made mistakes.  But this is no teen swiping my decor!  This is an adult homeowner wanting to decorate their own space WITH MY STUFF.  And, they clearly thought that the plant was cuter without the planter.  (They were wrong.)

Now I am on hyper alert at night in case they should return.  Last night I heard a noise and raced down to save my things.  It was just a kid playing soccer across the street.  At 2am.  

They also left muddy footprints on my rug.  Maybe CSI could make a cast of them and catch the scoundrels (this word has been edited for family friendliness on the blog).

Stay tuned to see what replacements get made.
And how we BOLT IT ALL DOWN.
GRRRRRRRRRRRR.


Tuesday, June 12, 2012

Wardrobe Update

I noticed a little problem in the girls' wardrobe the other day.
Remember how I had them clean it out in April?
Well, not so clean anymore.


The problem seemed to be that a certain small someone had an extraordinary amount of shoes in there.  
So I put anything that seemed a bit big or that was not often used (like the rain boots) up here.


But I was still left with this.


I grabbed a bin from my storage room and put all the shoes in it.  The boots are lined along the back.
We'll see if this works better.


When an space you've previously organized gets a bit unruly, take a good look at figure out what has gone wrong.  Often a small tweak will fix the problem and get things running efficiently again.


Saturday, June 2, 2012

A Shelf Project

This is Dino's side of the bed.


Pretty tidy.  But a few days before this picture it was not looking so good.  Now, Dino's not a messy guy, but we all know that things pile up.  There were some boxes under the dresser and some binders on the floor by the wall.  My rule is that when the vacuum can't touch the walls around the perimeter of a room, then we need to rethink things.

So anyway, Dino cleaned and it looked much better.  But I had a feeling that in a few months time, we'd be right back where we started.

So I had this idea to give him a shelf.  I painted up this little guy.  My neighbours think I have a spray paint addiction.


But I wasn't totally happy with this location.


Then I got an idea.
How about castors?
So Dino helped me attach castors and a handle.  And then I got another idea and just for fun I painted a little message board on it as well.


But my stinky green painters tape let the paint bleed through and then ripped off some of my new white paint.
Arg.
So I had to re-spray.  Happily my neighbours were not outside that day.
Sadly in my excitement to fix the paint, I sprayed the castors.
Duh.


Anyway, eventually I got everything sorted out and put all Dino's books from the window sill on the shelf.


And then...I rolled it away!
So fun.
And I can even write him little messages on it.


Much better.

Sunday, May 27, 2012

DIY Curtain Hem

If you know how to sew, then you need to stop reading now.

But if hemming a curtain seems just out of your reach, then read on!  I promise it is not hard at all, although it takes a bit of time.  I am not a great sewer, not even a good one, and I am not gonna teach you a super professional way to whip up a hem.  But my method works and is especially useful if you are of the not so patient variety.

My hemming project is to shorten the curtains in my oldest's room.  He has 6 altogether and their length was making the whole room feel heavy.


Step One
Wash and dry the curtains in question.

Step Two
Iron.

One
Two


Step Three
Rehang the curtain.

Step Four
Mark where you want the bottom of the curtain to hang to.  You should really pop a pin in, but I just hold it in that spot.

Three
Four


Step Five
Fold the curtain up at the mark and double check that it is straight by comparing the fold at both ends of the curtain.

Step Six
Iron the fold.

Five
Six


Step Seven
Cut off the excess fabric leaving enough to turn under.

Step Eight
Take a minute to fold up the excess as you go so that if you are doing a big job you don't have a whole bunch of clean up at the end.

Seven
Eight


Step Nine
Fold fabric under.  You should really use pins here too but I hate them so I just make sure to hold the fold in place.

Step Ten
Sew alone the top edge of the fold.

Nine
Ten


Step Eleven
Don't forget to do a little reverse at the beginning and end of your hem.

Step Twelve
Put up your first curtain to make sure it hangs at the right spot.  If it does, use it as a guide to measure the rest.

Eleven 
Twelve


And there you have it.
Easy, breezy.


Monday, May 21, 2012

DIY Outdoor Space

As you may remember, over the winter we got a new porch.  
Once the snow disappeared I wanted to start using it.


Step One - Find Furniture
I started looking for some furniture.  There is a huge variety of outdoor stuff and much of it is really gorgeous.  But, also really expensive.  And depending on your space, you really need to find something that is the appropriate scale.  I kept seeing these super cute little wicker sets but they were all so teeny...like for an apartment balcony perhaps.  Finally I found a good sized wooden couch on Kijiji.  

This is the couch with the original cushion fabric.  It was also a different colour when I bought it but I painted it with some old paint I had in storage.  If you can use what you already have it cuts down on cost.


Step Two - Make it Your Own
Recovering the cushions was not as hard as it may sound.  I am not a sewer...I can manage a straight line but that's about it.  So believe me, if I did it, you can too.

First cut your fabric so that it will go around the cushion.

Outdoor fabric.

Next, sew the side and one end so you end up with a big pillow case.  Turn it right side out and put the cushion in.


Sew up the end with a fancy disappearing stitch.  I dunno what you really call it and I am sure that sewers with real talent have got tutorials on the internet that you can check out if you aren't familiar with it.


I covered 3 toss cushions that I wasn't using anywhere with the same method, also with outdoor fabric.


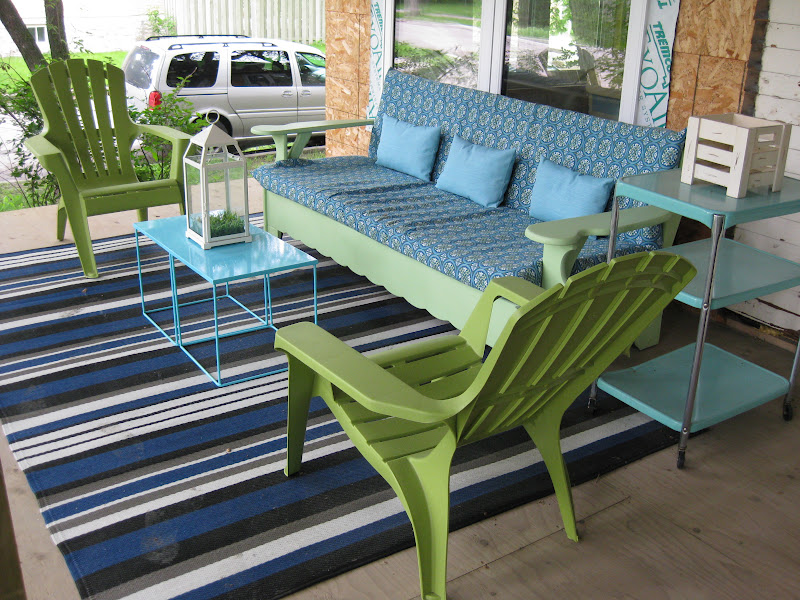
The finished product.


Step Three - Accessorize
I shopped around and to find some faux Adirondacks at a great price that would match up with my couch.  The outdoor carpet is from Walmart and was an amazing price also.


I found this cutie for free on give away weekend.


My son dragged this home from our back lane.  I sprayed it black.


Everything else I accessorized with I shopped the house for.  I had a little turquoise cafe set already so I had it in mind when I was choosing colours for the rest of the porch.

Now.  Let's stop a moment.  We are in reno right now so our house still looks...well, bad.  We have no siding yet, we have no yard yet, we have no sidewalk yet.  And the porch is not done...no railing built, etc., etc. but if you wait until everything is perfect before you use your space...well, it just seems to me like a waste.  So, nope, it is not perfect up there on the porch.


Step Four - Swallow Your Pride
But there is no reason why you can't make an imperfect space useable...and even pretty.


Total cost?  $169

couch - $40
fabric - $55
paint - free
carpet - $40
Adirondack chairs - $17 each
cart and plant stand - free
All other items were previously owned.

So shop around for deals.  Use what you already have.  Watch for freebies. 
Enjoy!!